
Invalid traffic is a big problem for a publisher. Invalid traffic may cause closer to your Adsense account. To prevent invalid traffic, you need to find and fix invalid traffic sources. Invalid traffic is a growing problem for publishers monetizing sites with Google Adsense ads because Google doesn't provide any warning before disabling an Adsense account.
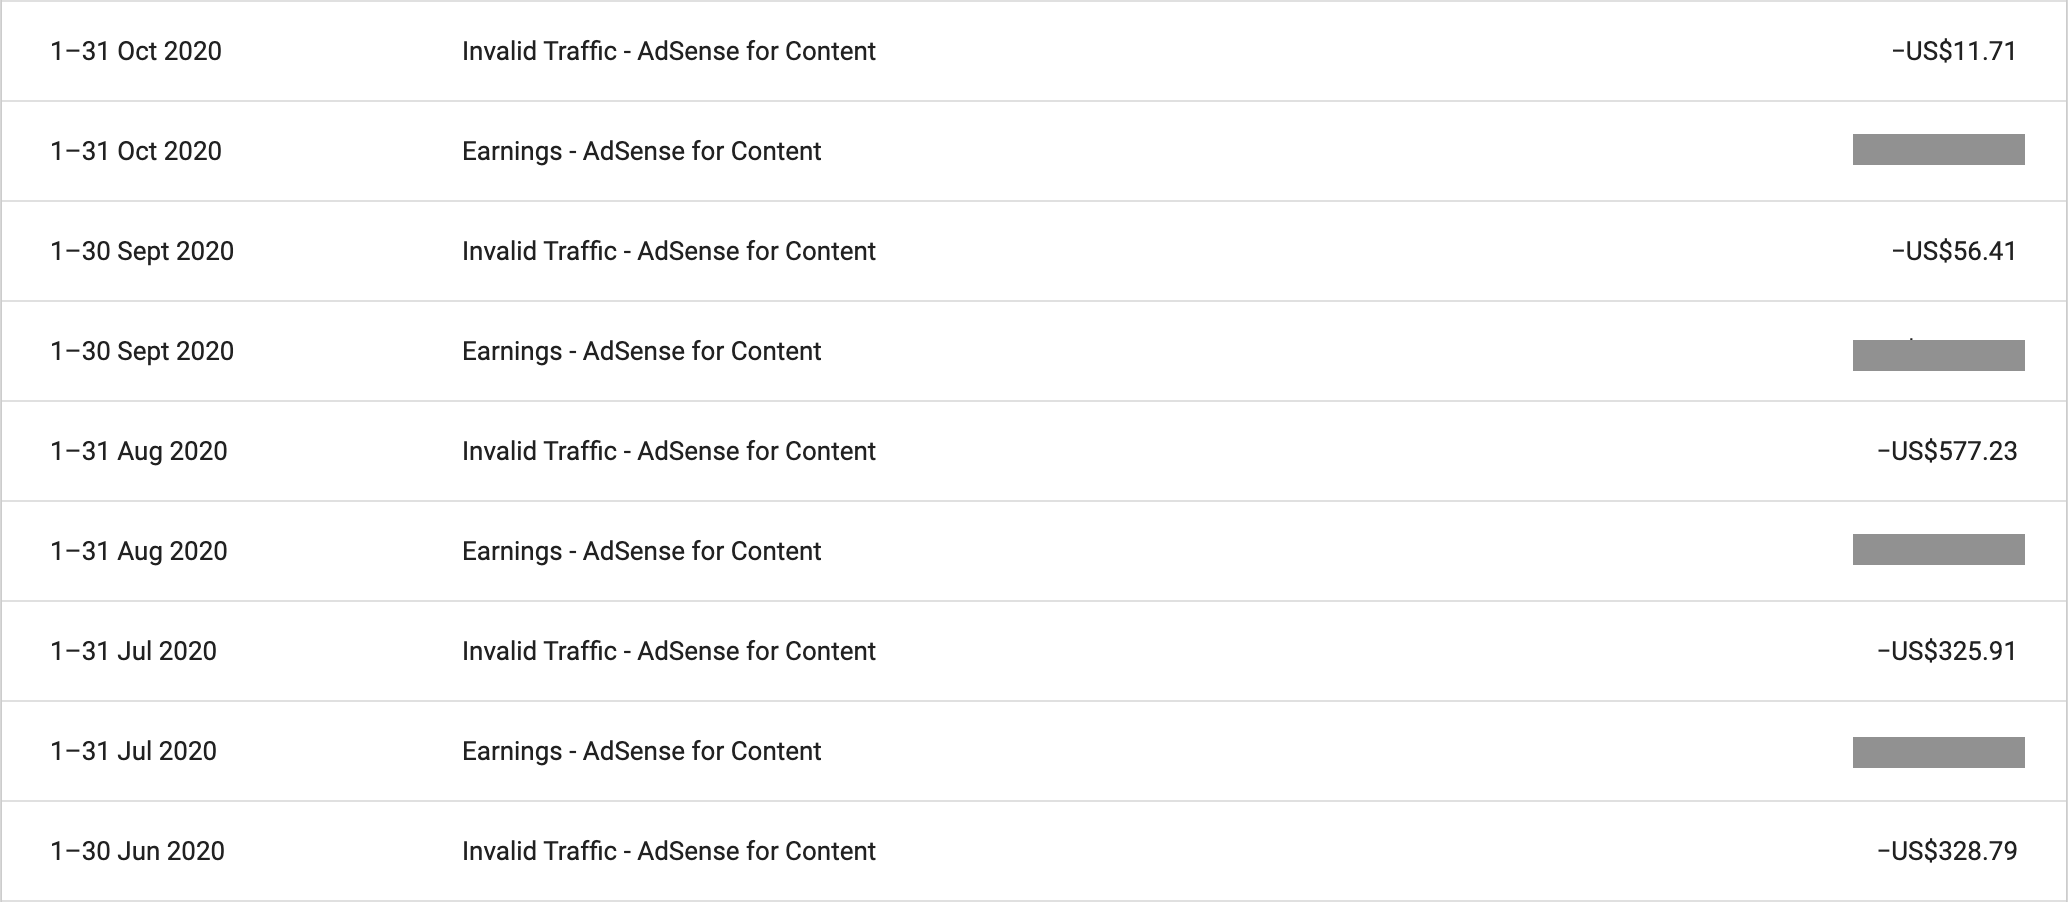
Today, We'll see how we prevented 98% invalid traffic using Invisible reCAPTCHA v3. Check the following image, how invalid traffics grow in June and August Month. We start investing invalid traffic in June we take some action like preventing multiple clicks on ads and loading ads after 1 sec so the bot should not be able to click on ads. But as you can see in August, invalid traffic grows to 77% compared to June. So, in August we Added Invisible reCAPTCHA v3, as you can see, invalid traffic decreased by 90% and 98% in September and October respectively compared to August.
1. What is Invalid Traffic?
Invalid traffic is any activity that doesn't come from a real user with genuine interest. It can include accidental clicks caused by intrusive ad implementations, fraudulent clicking by competing advertisers, advertising botnets, and more. Read more about Invalid Traffic from Google.
2. What is Invisible reCAPTCHA v3?
The invisible reCAPTCHA badge does not require any user input to check it is a real user or bot. So, here we call reCAPTCHA API via JavaScript which returns a score based on this score we've to alter the user experience. Here we can restrict the user to access the website or we can hide ads if it is a blog. For API call you need reCAPTCHA API key which you can get by registering your website to reCAPTCHA.
3. Register Website to reCAPTCHA
Register your website here to get reCAPTCHA v3 keys.

After registing your website, you can get APIs from Website Settings.

4. Invoke the reCAPTCHA Challenge
To invoke the reCAPTCHA challenge, load the reCAPTCHA JavaScript API with your site key which we generated in last step.
<script src="https://www.google.com/recaptcha/api.js?render=YOUR_reCAPTCHA_SITE_KEY"></script>
After this call grecaptcha.execute on site load or on action you wish to protect.
<script>
grecaptcha.ready(function() {
    grecaptcha.execute('reCAPTCHA_site_key', {action: 'submit'}).then(function(token) {
        // Add your logic to submit token to backend server
    });
});
</script>
In the above API call, we'll get a token which we need to verify with an API call from our backend. Note, we need to send the token immediately to the backend to verify the request because this token expire after two minutes. Here we are going to use Firebase Cloud Function to verify the reCAPTCHA response. You can also use your custom backend here.
5. Create a Firebase Project
Go to the Firebase console and create a new project. You may have to add billing information as we are going to use Node 12. Don't worry as we tested with 100K+ request our billing was $0.054 or ₹4 only for one month. Once you create the project, there's nothing else you need to do in the project from the Firebase console.
6. Install Firebase CLI
You can install the Firebase CLI from here using a method that matches your operating system. No matter of how you install the CLI, you have access to the same functionality and the firebase command.
7. Setup Project Directory
Using the Firebase CLI, make sure you're logged in with the same Google account that you used to create the project. Use the following command to log in -
firebase login
Now, create a project directory and initialize it with the following -commands
mkdir my_project
cd my_project
firebase init

Now, Firebase CLI will ask you some question please select the following options -
- Feature -> "Functions: Configure and deploy Cloud Functions"
- Project -> Select same project which we created in Step 5
- Language -> JavaScript
- ESLint -> You can select anything
- Install dependencies with npm -> Yes
After all these steps you will see this
✔ Firebase initialization complete!
8. Add requires dependencies
We need to add some dependencies to our project to make a request. So, add request and request-promise along with other preinstalled dependencies using the following commands -
npm install --save request
npm install --save request-promise
9. Create a Cloud Function to Verify the reCAPTCHA Token
Now we'll create a Firebase Cloud Function to verify the reCAPTCHA token from Step 4. Open index.js file copy-paste following code -
const functions = require('firebase-functions');
const rp = require('request-promise');

exports.verify = functions.https.onRequest(async (req, res) => {
    res.set('Access-Control-Allow-Origin', '*');
    res.set('Access-Control-Allow-Headers', '*');
    res.set('Access-Control-Allow-Methods', 'POST, OPTIONS');

    const response = req.query.response
    rp({
        uri: 'https://recaptcha.google.com/recaptcha/api/siteverify',
        method: 'POST',
        formData: {
            secret: 'YOUR_SECRET_KEY',
            response: response
        },
        json: true
    }).then(result => {
        console.log(result);
        let response = { result: result.success ? 1 : 0, score: result.score }
        res.send(200, response);
        return;
    }).catch(reason => {
        console.log("Error Catch - ", reason);
        let response = { result: 2, score: 0.0 }
        res.send(400, response);
    })
});
Don't forget to replace YOUR_SECRET_KEY with the actual secret key from Step 3.

10. Deploy Firebase Cloud Function
To deploy the above cloud function run the following command -
firebase deploy
After a successful deployment, you'll see the output that the function is assigned its own URL, which looks something like this -
https://us-central1-your-project.cloudfunctions.net/verify
11. Verify reCAPTCHA Token
Now, we just need to verify the reCAPTCHA token from Step 4 using above verify API.
<script>
grecaptcha.ready(function() {
    grecaptcha.execute('reCAPTCHA_site_key', {action: 'submit'}).then(function(token) {
        //verify token
        var client = new XMLHttpRequest();
            client.timeout = 60000;
            client.onreadystatechange = function () {
                if (client.readyState == 4 && client.status == 200) {
                    let response = JSON.parse(client.responseText);
                    if (response && (response.result == 1 && response.score < 0.5)) {
                        //possibly bad user
                    } else {
                        //good user
                    }
                } else {
                    //somthing went wrong with firebase cloud function or token or request
                }
            };
            client.open('POST', 'https://us-central1-your-project.cloudfunctions.net/verify?response=' + token);
            client.send();
        });
    });
});
</script>
Here response object from above verify API -
{
  "result": 0, 1, or 2 // 0 → Failed, 1 → Success and 2 → Error (Check server log)
  "score": number      // the score for this request (0.0 - 1.0)
}
reCAPTCHA v3 returns a score (1.0 is very likely a good user, 0.0 is very likely a bot). Based on this score, you can take your own action in the context of your site. By default, you can use a threshold of 0.5 for good user.
Here the reCAPTCHA Admin Dashboard screenshot of one of our websites as you can see 2.6% out of 215K requests are suspicious. (Note that the reCAPTCHA Admin dashboard shows requests after 1-2 days.)

So, This is how we can use reCAPTCHA to prevent invalid traffic from our websites.